
Working with Room and Lighting
The Room folder in the Hierarchy holds everything around the table: the four surrounding surfaces, their posters, ambient/fog/skybox settings, and every light. The Table node is the playing surface itself, authored separately.
The camera can leave the room here#
In the Room Editor — and only in the Room Editor — the camera is not held inside the play box. Orbit out through a wall, or fly under the floor, and the room stays where it is: the wall between you and it cuts away as usual, so you can look straight in. That is what makes a light behind a wall, or a scenery model standing outside the box, something you can actually see while you drag it.
Fly can go as far as scenery can: 500 ft out from the room's centre in every direction, including up and down. This is the same limit an environment placement has, so any building or skyline you can place, you can also fly to. Fly speeds up the farther you get from the room (up to 12×), so reaching the edge takes seconds and moving around inside the room stays slow and precise. The orbit camera's zoom still stops a few room-widths out. To orbit a distant building, pan the focus out to it.
Everywhere else — playing, the Table and Model editors, VR — the camera stays inside the room. Walk mode keeps you on the floor even here, because walking is a person standing in the room.
Table, floor and ceiling#
- Table — the playing surface's color and an optional texture.
- Floor / Ceiling (under Walls) — each gets color, texture, tiling (0.1–16, how many times the texture repeats across the surface), and a material box that, when assigned, overrides the inline color/texture entirely.
Hiding a surface — "an empty Color does not mean an empty wall"#
An empty Color, Texture and Material do not mean the surface is unpainted. They mean it inherits the built-in look — the textured deck floor and plaster walls the stock table shows. So a room whose Inspector fields are all blank still renders walls, and until now there was nothing in the panel that said so and no way to get rid of them.
Every surface — Floor, Ceiling and each Wall — now has a Hide this floor / ceiling / wall checkbox. Use it when your own imported geometry is the room and the built-in shell is in the way.
⚠ Hiding is visual only: the surface keeps its collider. A hidden wall still stops a piece leaving the room. That is deliberate — a hole in what you can see must never imply a hole in what a piece can pass through unless you asked for one. To open a surface up physically as well, add an Opening with its barrier set to open.
Walls and posters#
The four walls (North / East / South / West) share the same fields as floor/ceiling — color,
texture, tiling, material — plus + Add Poster. A poster is an image plane offset inward
from its wall, oriented to face the room, with:
| Field | What it controls |
|---|---|
| Label | Your own name for it (not shown on the table) |
| Image | The texture it displays |
| Horizontal (U) / Vertical (V) | Position on the wall, −1 to 1 |
| Width / Height | Poster size in world units |
Openings — windows, skylights, an open ceiling, a missing wall#
The room is a closed box by default, and that has a consequence worth stating plainly: in a closed box a skybox is a lighting control and nothing else. Measured on the stock room, a sky occupies 0% of the frame at every normal camera pose, including with a wall cut away — because backing the camera out makes you look down into the room, so the cutaway removes what is between you and the floor, never what is between you and the sky.
Every surface has its own Openings (N) folder — the floor, the ceiling and each of the
four walls, in the Hierarchy, under the surface itself. Select the one you want and press a
preset:
| Preset | On a wall | On the floor or ceiling |
|---|---|---|
| Window / Skylight | 4 × 3 ft at eye height | 6 × 6 ft, centred |
| Doorway / Floor Inset | 3.5 × 7 ft, flush with the floor | — |
| Picture Window / Roof Light | 10 × 5 ft | 10 × 10 ft |
| Missing Wall / Open Roof / Open Floor | The whole surface | The whole surface |
Every field stays editable afterwards, and the same presets are on the opening's own panel under Re-shape, so "actually I wanted a door" is one click.
| Field | What it controls |
|---|---|
| Label | Your own name for it |
| Surface | Which surface it is cut into — move a window to another wall and its row re-files itself |
| Across (U) / Up (V) | Position on that surface, −1 to 1 — the same coordinates a poster uses. ±1 sits flush with the edge; an opening can never hang off its surface. The panel also prints the position in feet, which is usually the number you want. |
| Width / Height | Size in feet. On the floor and ceiling, "height" runs along +Z. |
| Open (no glass) | Whether it is a hole in the collider as well as in the picture. See below. |
Drag it in the viewport. With an opening selected, the move gizmo slides it along its surface and the scale gizmo resizes it — both in the surface's own axes, so an opening cannot be pushed out of the wall it is in. There is no rotate handle, because an opening has no rotation to store.
Missing Wall sizes the opening to its entire surface. That is how you author a room with no ceiling or a missing wall — there is no separate switch, because a missing wall is just an opening the size of the wall.
The floor counts as a surface#
A floor opening is an inset: a sunken play area, a stairwell, a glass panel over something below. Left glazed (the default) the floor's collider still spans the hole, so nothing falls through — you get the look without the pit. Tick Open and pieces really can drop out of the room, which is occasionally what you want and never something that should happen by accident.
Glazed or open — this is a physics choice, and it is yours#
An opening is glazed by default. You can see and light passes through it, but an invisible collider still spans the hole, so the room holds pieces in exactly as it did before you cut it. Tick Open (no glass) and the collider goes too: a flicked piece really can fly out of the room and never come back. That may be exactly right for an open-air room; it is never something that should happen by accident, which is why it is opt-in per opening.
The ceiling is the one exception, and it is pre-existing: the ceiling has never carried a collider at all, so on the ceiling this setting records your intent and changes nothing today.
What is outside#
Cut a window and you are looking at a world that, until now, contained nothing but an 18 ft floor slab — so the sky renders below the floor and the view reads as broken. The Environment row therefore carries Outside the room: a single flat ground plane at the floor line, in a colour you choose. It costs one draw call, casts no shadow, has no collider, and is only built when the room actually has an opening. Set it to Nothing if you want a room floating in sky on purpose.
Cost#
An opening does not add a shadow caster — ever. The surface it pierces is rebuilt as a frame of boxes carrying exactly the flags the original surface had, and a glazed pane draws nothing at all. What it does change is draw calls: a window costs about three more than the intact surface, and removing a surface outright costs one fewer. The Room budget readout on the Lights folder counts this for you.
Ambient, fog and skybox#
Select Room itself for scene-wide environment settings: Ambient color, Fog (on/off, color, density), and an optional Skybox texture. These apply once, for the whole scene — there's no per-wall override for any of them.
The skybox belongs to the room. A room pack carries its own sky, and if you want anyone to see it, the room needs an opening.
Using an HDR sky#
The Skybox slot takes an ordinary image (PNG, JPEG, WebP…) or an HDR panorama — a .hdr or
.exr from a source like Poly Haven. Prefer the HDR: an 8-bit image clips the sun to the same
white as a cloud, so the room lights flat, while an HDR keeps the sun's real brightness and the
table gets proper highlights, reflections and shadow direction. Either way the sky must be an
equirectangular (2:1) panorama.
- In the Asset Explorer, Upload the
.hdror.exr(or drop it on the explorer). From a Poly Haven download you need only that one file — the_TONEMAPPED.jpg,.png,.tres(Godot),.usdc(USD) and.blend(Blender) files are for other tools. - It lands in
skies/as a.hdr. An.exris converted on the way in; a sky over 10 MB is re-encoded and its resolution halved until it fits, and the status line says what was done. - Drag it onto Skybox.
A 10 MB sky is about 2K, which is plenty for lighting but a little soft as a visible backdrop. The size cap exists because every player downloads the sky. See Assets § HDR skies for the exact rules.
Turning the sky#
With a skybox assigned, two more fields appear:
- Sky rotation — the sky's orientation in degrees, per axis. Use it to put the sun, the horizon feature or the seam of a panorama where you want it.
- Sky spin (°/sec) — a rate, per axis, that the sky turns at continuously. The hint under
the field says the rate back as a duration, because degrees per second is unreadable at the
speeds that actually look like sky:
0.1is one turn every six minutes,0.01is one an hour.
Two things worth knowing:
- Turning the sky turns the light it casts. A sky is not a backdrop — it is the room's ambient and its reflections. There is one orientation for all three, so rotating the sky moves where the light comes from as well as where the picture is.
- A spin costs no bandwidth and needs no host. Every player derives the angle from the authored rate and the clock, so everyone sees the same sky without a single message being sent about it.
If the room has been baked (Static lighting → Bake), a spinning sky also turns the baked reflections with it — they share the engine's one environment rotation. Bake a still sky, or spin an unbaked one.
⚠ A player can switch the animation off (Settings → Graphics → Sky), and it starts off on the Low graphics level. Their sky then sits at the orientation you authored. So treat the spin as atmosphere, never as something the room depends on — Sky rotation is what everyone sees.
Baking static lighting#
The Room panel's Static lighting → Bake precomputes lighting for geometry that never moves — the floor, walls, ceiling, table, and any model you flagged Static scenery in the Model editor — and stores it in a lightmap.
What it buys is soft shadows and contact darkening: the gentle occlusion where a prop meets the floor, or in the corner behind one, that realtime shadow maps can't produce. What it does not buy is frame rate. Local lights are already close to free, so bake for looks, not speed.
Expect a brief freeze while it runs — it re-renders the scene once per light. That's why it's a button and not something that happens automatically.
The button reports what happened, e.g. 9 baked (3 scenery) · 2 no UVs · 240ms. The
no UVs count is models missing a second UV set; run Generate lightmap UVs on them in
the Model editor first.
Three things worth knowing:
- A bake is local to you. Lightmaps are not replicated and not saved — every player bakes their own, and a reload clears it.
- It's dropped automatically when it would go stale. Changing the room model clears the bake, and moving a baked object returns that object to realtime lighting on the spot.
- It's most worth doing once the room has props in it. A bare room of flat walls has almost nothing to occlude, so the result looks nearly identical to realtime. Add shrubs, planters and fixed set dressing first, then bake.
Lights#
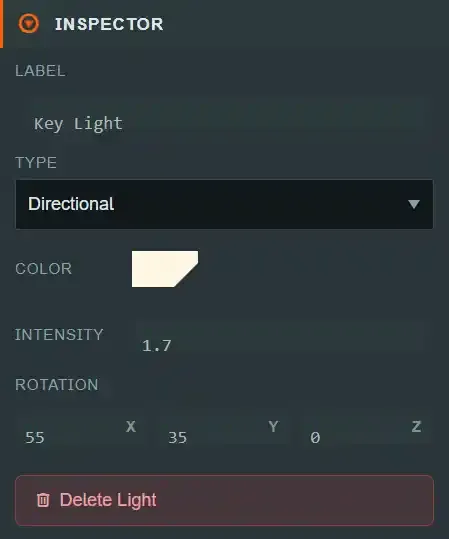
Select Lights (N) for + Add Light, then select an individual light for its fields:
- Label, Type (Point / Spot / Directional), Color, Intensity (0–8).
- Position — for every type. A light may sit outside the room box; a sun does.
- Rotation — for Spot and Directional lights, which is the direction they shine.
- Range (0.1–60) — for Point and Spot lights: how far the light reaches.
- Follow sky — for Spot and Directional lights: lock this light to the sky's rotation so it turns with it, like a sun.
A directional light shines from infinitely far away, so its position only moves its marker in the viewport — the shading comes entirely from its rotation.
Making a sun#
Tick Follow sky on a directional light and its rotation is composed with the sky's: aim it down the sun in your panorama once, and it keeps pointing there as the sky turns. Its Rotation field stays the aim within the sky, so the gizmo still edits what you authored rather than where the spin has currently carried it, and the light's marker shows the composed direction.
Follow sky turns a light; it does not carry it around. For a directional light that is the whole story — position never affects a directional light's shading or its shadows (the engine derives the shadow frustum from the camera), so a sun aims entirely by rotation. On a spot, the same lock swings the cone about wherever the light sits; it does not orbit the room.
⚠ This is the expensive half of a spinning sky, and only if the light casts shadows. A shadow-casting light that moves re-renders the shadow map; a moving sun therefore re-renders it as it travels (throttled to a quarter-degree of movement, so it is bounded, not per-frame). Ambient and reflections are free — they follow the sky whether or not a light does. Leave a shadow-casting sun spinning only if you are happy asking players for the frames — and note that a player who cannot spare them can switch the animation off entirely (Settings → Graphics → Sky), which parks your sun at its authored aim.
You can see where they are#
Every light in the Room Editor draws a marker: a small glowing bulb at its position, in the light's own colour, plus a cone pointing the way it shines for spot and directional lights. A point light gets no cone, because it shines every way at once.
Click a marker to select that light. With one selected the ordinary move gizmo drags it and rotate aims it — the same handles as everything else. Markers are an authoring aid: they exist only in the Room Editor, cast nothing, collide with nothing, and never reach a played table.
Deleting a light removes it immediately; there's no undo confirmation beyond the shell's normal Ctrl+Z.
Lights inside a scenery model#
If a model you place as environment scenery contains lights of its own, they appear under
Lights in a folder named after the placement, typed model light. Select one to change what
it does — on/off, colour, intensity, range, shadow casting.
Those settings are stored as an override on the placement, not as a copy of the light: the model stays the source of truth, so re-importing it keeps your settings, and moving the lamp in the model moves the light. That is also why there is no position field and no Delete — edit the model for those. Reset to the model's values drops the override entirely.
⚠ Shadow casting starts off, whatever the model says. Shadow views are the number that can refuse a publish, so a light inside imported scenery has to be asked for one — see the Room budget on the Lights folder.
Decor vs Environment Scenery#
A room places models in two different worlds, and the Hierarchy has a folder for each:
| Decor | Environment Scenery | |
|---|---|---|
| What it is | A prop inside the play box | The building, terrain or skyline the box sits in |
| Bounds | The room: 18 × 18 × 12 ft | ±500 ft, and it may sit below the floor for foundations |
| Collision | May opt into a static collider | Never — play happens inside the box |
Pick the scope on the placement itself, or add straight into the folder you want. Getting this wrong used to be the single most confusing failure in the Room Editor: a room-scale building filed as Decor is refused on save with three errors telling you scenery "cannot be placed outside" the very box it is supposed to contain. If you see that, switch the placement's Scope to Environment.
Environment scenery has no collision by design and cannot be made solid — the schema refuses it. Containment is the room shell's job, and a collider out beyond the walls could only ever catch a piece that had already escaped, while costing every player physics they cannot use.
⚠ Environment scenery is still inside the room shell visually unless you hide the surfaces
in its way. The quickest way is the Room row itself, whose panel carries show/hide
switches for the floor, all four walls and the ceiling at once, plus Hide all and
Show all. Hiding never removes a collider — a hidden wall still holds pieces in, and opening
one up physically is a separate, deliberate act (an Opening with Open ticked).
You can still use the per-surface Hide checkboxes so your own building is what players see instead of the built-in walls.
Scenery that brings its own floor#
Hiding the floor removes only its look. Tables and dropped pieces still stand on the room floor's top face at y = -0.95 ft. Every table pack is fitted to that height too, so a room that shows its own floor has to put that floor at the same height. Otherwise every table in the room hovers above your floor, or sinks into it.
The Room Editor checks this for you. Each Environment placement is probed straight down under the play area. The check ignores invisible surfaces, such as a fully transparent plane, and anything more than 3 ft above the room floor. When the scenery's floor is off by more than about ⅛ inch, the Environment Scenery folder lists it. Select the placement to see the gap, then press Align floor to room floor. That moves the placement straight up or down by exactly the gap and changes nothing else.
Placing decor and scenery#
Both kinds place almost the same way. Add one from its folder, then position it:
- Drag it in the viewport (Decor only). It rests on whatever surface is under the cursor and stays inside the room. Environment scenery is never picked by a click in the viewport: its bounding box contains the camera and the whole play area, so it would catch every click that missed a piece. Select it from the Hierarchy instead. Tick Lock placement to give a large decor prop the same protection.
- Use the Move / Rotate / Scale tools. The gizmo attaches to the selected placement and writes the same Inspector fields, so it is a second way to author the numbers rather than a second source of truth. Rotation is editable on all three axes, and scale per axis once you clear Lock scale to uniform.
A placement can never leave the room box: a drag that would take it outside is clamped, because the room-pack format refuses an out-of-bounds placement outright rather than quietly moving it.
The play-area guide#
Sizing a room-scale model against the game meant guessing, because the table and the room shell had no visualisation at all — only ordinary table objects did. The viewport's Play area toggle now outlines, in orange:
- the table's play surface — the footprint and height pieces actually rest on; and
- the room bounds — the interior your geometry has to live inside.
It is read-only reference geometry, drawn from the same numbers the real table and room are built from rather than re-measured, and it is a per-session viewing aid: it is never saved, never published, and never drawn at a real table. Seat zones are not duplicated here — the Player zones debug overlay already draws those.
Common mistakes#
- Setting a texture on a wall and expecting a poster's position to move with it. A poster's U/V position is independent of the wall's own texture tiling — moving one doesn't move the other.
- Adding a Position to a directional light and wondering why nothing changes. Directional lights only read Rotation — position and range fields don't apply to that type and are hidden once you switch to it.
- Setting a skybox and never seeing it. A closed room shows a sky 0% of the time. Add an opening — a skylight is the quickest — or accept that the sky is only lighting the room.
- Ticking "Open (no glass)" on a window at table height. It does what it says: pieces can leave through it. Glazed is the default for a reason.
- Forgetting fog and skybox are scene-wide. There's no way to fog one wall and not another; those settings live on the Room, not per-surface.
- Assigning both a material and an inline color/texture to the same surface. The material box, once set, overrides the surface's inline color/texture/tiling entirely — clear the material to fall back to the inline fields again.
See also#
- Working with materials
- Working with textures
- Lighting a scene — the click-path walkthrough