
Your first mod
This page is the shortest real path from nothing to a mod you can put in front of another player: create it, put one thing on the table, save it, fill in its discovery details, publish it to GitHub, and open a multiplayer room with it. Every step below states what "done" looks like and what to do if it doesn't work — if you follow this exactly and something still goes sideways, that gap is a bug in either this page or the product, not something you did wrong.
Every step below is written from source and the already-published reference pages it links to — it has
not been walked end-to-end in a live browser as part of writing it. A browser-validator pass against a
clean account does that separately and corrects this page against reality before it's trusted blindly. Two
steps (Connect GitHub and Publish) additionally depend on server-side
GitHub OAuth configuration — see the callout at that step for exactly what that means and how to tell
whether it's set up on the deployment you're using.
Before you start#
You need a DiceyTable account (or anonymous dev auth, if you're running a local deployment) and a GitHub account. You do not need a GitHub repository already made — the New Mod dialog can create one for you.
1. Open Edit Mode and start a New Mod#
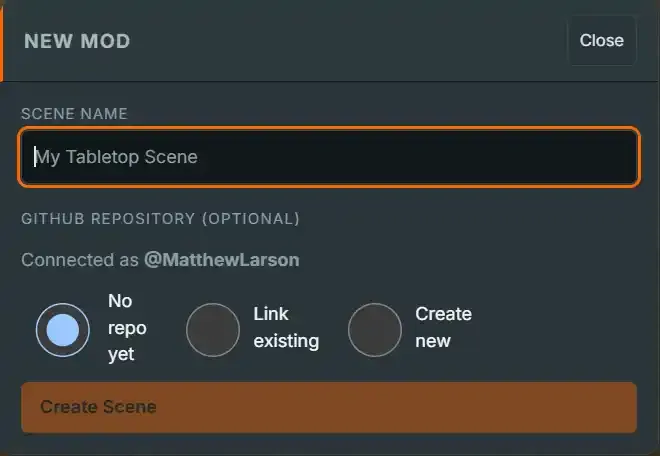
Do this. Go to /editor (or click the Edit Mode toggle on the /table toolbar). If this is your first
scene, the New Mod dialog opens on its own; otherwise click + New Mod. Type a scene name — anything
recognizable, like "My First Mod" — in Scene name.
Definition of done. The New Mod dialog shows your scene name and is waiting on you to decide how this mod relates to GitHub (the next step) before Create Scene does anything useful.
If it fails. The dialog not appearing at all on a fresh account is a bug worth reporting, not something to work around. If Create Scene stays disabled, the scene name field is empty — it's the only strictly required field at this step.
2. Connect GitHub#
Do this. In the same dialog, choose Create new. If you're not connected to GitHub yet, click Connect GitHub first — a popup sends you through GitHub's own OAuth consent screen (see Connect GitHub for what this does and doesn't grant DiceyTable access to). Once connected, give the new repository a name. DiceyTable creates it public — the dialog says so, and it matters: every player who later joins a room with this mod pulls its files straight from GitHub, so a private repo would be unplayable for everyone but you. Click Create Scene.
⚠ This step requires the server you're using to have GitHub OAuth configured — four environment variables (
GITHUB_OAUTH_CLIENT_ID,GITHUB_OAUTH_CLIENT_SECRET,GITHUB_OAUTH_CALLBACK_URL,GITHUB_OAUTH_WEB_ORIGIN), unset by default. This is a one-time, server-side setup a mod author can't fix from the editor. If Connect GitHub fails with "GitHub publishing is not configured on this server," see Troubleshooting — and if you're standing up your own local deployment, that page also links what to put inapps/server/.env. This page cannot verify locally whether OAuth is configured on the environment you're reading this in — that's specific to the deployment, not to the product.
Definition of done. Edit Mode opens on your new, empty scene. The Hierarchy shows Room, Table, Player Zones (N) and Entities (0) and nothing else. If you open the Publish dialog now, it shows your new repository already filled in.
If it fails. "Create Scene" without connecting GitHub first is legal too — see Workflow: Starting a New Mod — but you cannot continue past Publish later without linking a repository eventually, so do it now while you're already in the dialog. Linked an existing repository you don't actually control? A push will fail later at checkpoint/publish time; confirm you have write access before linking one instead of creating new.
3. Author something small#
Do this. You need at least one object on the table before there's anything to check in. In the Asset Explorer (the panel beneath the viewport), open Presets → Models and drag any tile — a die is a good first choice — onto the viewport.
Definition of done. A new row appears under Entities (1) in the Hierarchy, and the piece is visible
on the table surface in the viewport. Selecting it shows its PIECE kind (die, for a die preset) and a
transform in the Inspector.
If it fails. Nothing to drag under Presets → Models? Confirm you're looking at the Presets root, not Project — a brand-new mod's Project → Models folder is empty until you upload your own. See The Asset Explorer for the full panel if the two-root layout is unfamiliar.
4. Save Draft#
Do this. Click Save Draft (or press Ctrl+S).
Definition of done. The unsaved-changes indicator clears. Under the hood, this also triggers the
debounced auto-checkpoint to your repository's wip branch a few seconds later — see The Publish
Flow for what a checkpoint
does and, just as importantly, what it does not do (it does not make your mod playable by anyone else —
that's Publish, two steps from now).
If it fails. Save Draft stays disabled only when there's nothing to save or no project is loaded — if you just placed an object in the previous step, this shouldn't happen. A checkpoint push failing silently in the background is retried automatically once; you don't need to do anything about a single transient failure.
5. Fill in Mod Details#
Do this. Click Mod Details. It opens the manifest editor — a tab named diceytable.mod.json — on
its Details tab. Fill in a title, a short summary, a square cover image (there's a crop tool
if your source image isn't already square), and at least one screenshot. Close the tab when you're done.
You can ignore the other tabs for now: the Files tab keeps the manifest's file list up to date on its
own.
Definition of done. Closing the Mod Details tab after making changes triggers an automatic save and checkpoint — you don't need to separately hit Save Draft again. These four fields are exactly what Publish checks for next.
If it fails. If you skip this step and go straight to Publish, the Publish button will be disabled and the dialog will tell you which of the four fields is still missing — see Publishing Troubleshooting § Publish button is disabled. Come back here and fill in whatever it names.
6. Publish#
Do this. Open Publish and click the publish action
(Publish (wip → main)).
⚠ This step needs the same GitHub OAuth configuration as step 2. If you got past step 2 successfully, publishing itself needs no additional server configuration beyond what you already confirmed works — this callout exists so a reader skimming straight to this step doesn't miss the dependency.
Definition of done. Three things happen in order, and the dialog reports each one: your full current
tree is pushed to wip, wip is merged into main, and the mod is registered (scanned and recorded as
playable, or recorded with whatever compatibility issues the scan found). A compatible result means your
mod — die and all — is now live at a stable, public GitHub URL that anyone's client can pull from.
If it fails. A merge conflict means something changed main outside the editor (a direct GitHub
push) — resolve it on GitHub, then publish again; there's no in-editor conflict resolver. If push and merge
succeed but registration fails (a network blip), the dialog says so plainly: your files are on main,
but you'll need to add the mod manually from the mods library, because pushed files alone don't make a mod
playable. If registration succeeds but the scan finds a problem, the result reports incompatible with the
first issue found — see What gets rejected to look it up by code,
or Fixing a rejection to look it up by symptom. Full detail on every
step of this flow is on The Publish Flow.
7. Open a room and play it#
Do this. Your mod's public page is at /games/<your-mod-slug> (the slug comes from its title). Open it
and click Play — this starts a table with just this mod selected, no extra dialog. (You can also start a
table the general way from the homepage's Start a Table, then pick your mod from the mods library, if
you'd rather choose from a list.)
Definition of done. The table loads and your die (or whatever you placed in step 3) is sitting on it. You're the host. To bring in a second player, use the Invite / Room ID control on the table toolbar to share the room — a teammate who opens that link independently pulls the same mod files straight from GitHub and joins you at the same table.
If it fails. The table loads but is empty. Confirm the object you placed in step 3 was actually saved — reopen the mod in Edit Mode and check the Hierarchy. A teammate sees placeholder boxes instead of your piece. Their client's asset pull may still be in progress, or one file failed to download — see Publishing Troubleshooting § Assets render as plain placeholder boxes. Your teammate can't select your mod at all when starting their own table. They can only see mods that completed registration — confirm step 6 actually reported a compatible (or at least registered) result, not a failure partway through.
You're done — where to go from here#
You've published a mod with one preset object and played it in a room. From here:
- Add more objects the same way, or start importing your own models instead of presets.
- Give your mod behavior with a script — see Choosing a
surface to decide between a table script (authored in Edit
Mode) and a mod script (
entry.script, capability-gatedapi.*calls). - Lay out a starting arrangement of objects deliberately rather than placing them one at a time — see Setup
JSON for what your scene's
setup.jsonactually contains. - Read Anatomy of a mod for the complete file tree a more
developed mod grows into, and Manifest reference for every field your
diceytable.mod.jsoncan declare.
See also#
- Workflow: Starting a New Mod — the editor-guide version of steps 1–2, in more depth.
- Connect GitHub · The Publish Flow · Registration & Multiplayer Play — the full publishing model.
- Manifest reference · Fixing a rejection — when something about your manifest or setup needs a closer look.
- Publishing Troubleshooting — every failure branch above, in depth.
- Mod scripting API —
exports,ModExports.setupand the 25 methods yoursetupfunction is handed.